 Download DownloadUpdateSite Class
GitHub: https://github.com/bartonlp/updatesite
This class works with SiteClass. It creates sections or articles that can be placed within a webpage. The articles can be edited via a web browser and they are maintained in a database (MySql is prefered). Check out SiteClass Documentation and Examples.
Install
You can either clone the repository or you can use composer to install UpdateSite.
If you do not have composer you can get it at https://getcomposer.org/download/. Just follow the instruction to install it globally.
Once you have composer select a directory where you want your repository and enter:
composer require bartonlp/updatesite dev-master
How It Works
The sections are stored in a database. Currently there are two databases the SiteClass supports:
* MySql. This uses the most current PHP library (mysqli)
Sqlite2. This is not as well tested but should work withUpdateSite*
The database schema for MySql looks like this:
CREATE TABLE `site` (
  `id` int(11) NOT NULL AUTO_INCREMENT,
  `page` varchar(255) NOT NULL,
  `itemname` varchar(255) NOT NULL,
  `title` varchar(255) DEFAULT NULL,
  `bodytext` text,
  `date` datetime DEFAULT NULL,
  `status` enum('active','inactive','delete') DEFAULT 'active',
  `lasttime` timestamp NOT NULL DEFAULT CURRENT_TIMESTAMP ON UPDATE CURRENT_TIMESTAMP,
  `creator` varchar(255) DEFAULT NULL,
  PRIMARY KEY (`id`)
) ENGINE=MyISAM DEFAULT CHARSET=utf8;
The 'creator' field is only used if you have extended the SiteClass to handel members.
You can create a webpage as follows:
<?php
// test.php
// See the SiteClass documentation
$_site = require_once(getenv("SITELOAD"). "/siteload.php");
$S = new $_site->className($_site);

// The following comment is needed by UpdateSite.
// This must be at the beginning of the line and have the words 'START UpdateSite'
// followed by the name of the database item. This can be anywhere in the file but
// I like to put it close the the invocation of UpdateSite.

// START UpdateSite Message
// START UpdateSite AnotherMessage

$s->siteclass = $S; // This is the SiteClass object or one of its children
$s->page = "test.php"; // The name of the page
$s->itemname ="Message"; // The name of the database item

$u = new UpdateSite($s); // instantiate the class

$item = $u->getItem(); // gets the item in 'itemname'. You can set a different value and then call with $s.

// If item is false then no active item in table

if($item !== false) {
  $message = <<<EOF
<div>
<h2>{$item['title']}</h2>
<div>{$item['bodytext']}</div>
<p class="itemdate">Created: {$item['date']}</p>
</div>
<hr/>
EOF;
}

$s->itemname = "AnotherMessage"; // set $s with a different name
$item = $u->getItem($s); // call getItem($s) with the new itemname.

if($item !== false) {
  $anotherMessage = <<<EOF
<div>
<h2>{$item['title']}</h2>
<div>{$item['bodytext']}</div>
<p class="itemdate">Created: {$item['date']}</p>
</div>
<hr/>
EOF;
}

// Use SiteClass to get the top and footer

list($top, $footer) = $S->getPageTopBottom();

echo <<<EOF
$top
<h1>Example 1</h1>
$message
$anotherMessage
$footer
EOF;
The comment // START UpdateSite Message is important. This is used by UpdateSite to find the sites that can be created/edited. The comment must start at the beginning of a line and must have START UpdateSite be exactaly as shown followed by the name of the item, in this case 'Message', and then optionally a human readable text in quotes. For example "Webmaster's Message".
If you run this example it will show no messages.
Create the Database Entries.
To create the database entries you can run the following program.
<?php
// testupdatecreate.php

$_site = require_once(getenv("SITELOAD"). "/siteload.php");
$S = new $_site->className($_site);

// Get site info

$h->title = "Update Site For Granby Rotary";
$h->banner = "<h1>Update Site For Granby Rotary</h1>";

// UpdateSite::firstHalf() is a static member.
// UpdateSite::firstHalf($S, $h, [$nextfilename]);
// The third parameter is optional.
// $nextfilename can be set if we want a file other than the default which is "/updatesite2.php".

$page = UpdateSite::firstHalf($S, $h, 'testupdatesite2.php');

echo <<<EOF
$page
<br>
<a href="testupdateadmin.php">Administer Update Site Table</a><br/>
$footer
EOF;
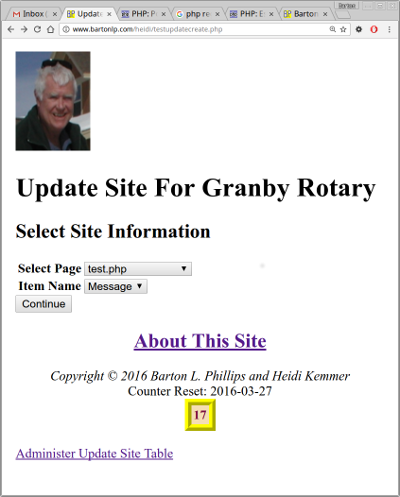
This is the first half of the creation program. As you can see the two drop downs are locked together by JavaScript. You can select the page (the name of the webpage you created) and then select the database item you want to edit.
Edit the Selection
The second screen lets you edit the selected item.
<?php
// testupdatesite2.php

$_site = require_once(getenv("SITELOAD"). "/siteload.php");
$S = new $_site->className($_site);

$h->title = "Update Site For Heidi";
$h->banner = "<h1>Update Site Admin For Granby Rotary</h1>";
$h->extra = <<<EOF
  <script src="http://ajax.googleapis.com/ajax/libs/jquery/1/jquery.js"></script>
  <script type="text/javascript">
jQuery(document).ready(function() {
  var auto = 1;

  $("#updatesiteform #formtablesubmitth input")
  .after("<input type='button' id='render' style='display: none' value='Quick Preview'/>" +
        "<input type='button' id='autopreview' value='Stop Auto Preview' />");

  $("#updatesiteform").after("<div style='padding: 5px; border: 1px solid black' id='quickpreview'>");
  $("#quickpreview").html("<div style='border: 1px solid red'>TITLE: " + $("#formtitle").val() +
                            "</div>" + $("#formdesc").val());

  $("#autopreview").click(function() {
    if(auto) {
      $(this).val("Start Auto Preview");
      $("#render").show();
      auto = 0;
    } else {
      $(this).val("Stop Auto Preview");
      $("#render").hide();
      $("#render").click();
      auto = 1;
    }
  });

  $("#render").click(function() {
    $("#quickpreview").html("<div style='border: 1px solid red'>TITLE: " + $("#formtitle").val() +
                            "</div>" + $("#formdesc").val());
  });

  $("#formdesc, #formtitle").keyup(function() {
    if(!auto) return false;

    $("#quickpreview").html("<div style='border: 1px solid red'>TITLE: " + $("#formtitle").val() +
                            "</div>" + $("#formdesc").val());
  });
});
  </script>
EOF;

$s->site = "heidi";

UpdateSite::secondHalf($S, $h, $s);
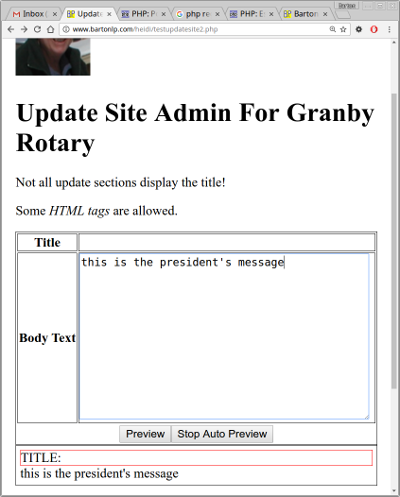
When you click on the 'preview' button you will get the third page.
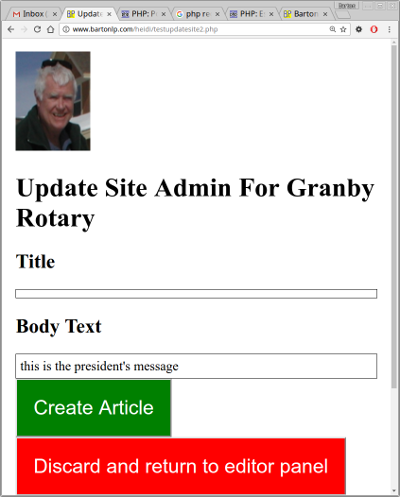
Once you click the 'Create Article' you can go back to your first page and you should see messages.
Enhance the Sections
You can change the 'testupdatecreate.php', 'testupdatesite2.php' and 'updatesite-simple-preview.php' to make them work better with your site. There are two other preview pages that you can use: 'updatesite-preview.php' and 'updatesite-new-preview.php'.
Contact Me
Barton Phillips : mailto://[email protected]
Copyright © 2022 Barton Phillips
Project maintained by bartonlp
|
